
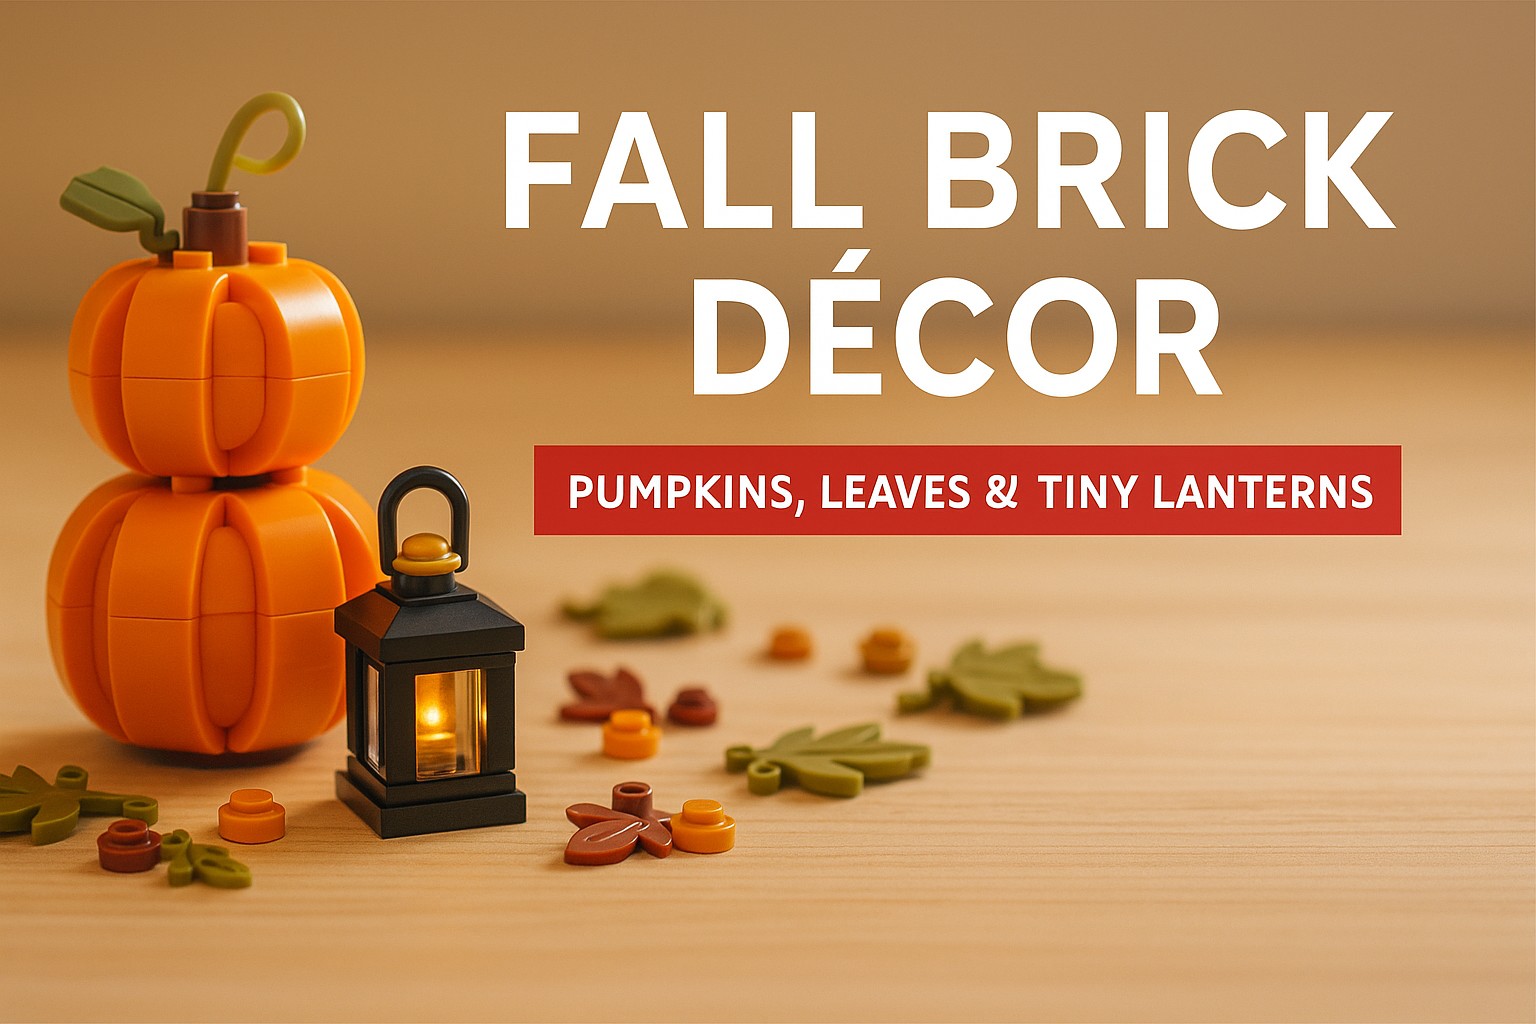
Sweater weather, but make it studded.
These three LEGO compatible mini builds, plump pumpkins, leafy sprigs/garland, and tiny lanterns, turn any shelf, mantle, or desk into a cozy autumn vignette. Each project is fast, remixable, and easy on parts. Build one in a coffee break or batch all three for a full fall scene.

What You’ll Build (at a glance)
| Build | Time | Skill | Footprint | Vibe |
|---|---|---|---|---|
| Stacked Pumpkins (2 sizes) | 10–20 min | Beginner | 6×6 & 8×8 | Cozy centerpiece |
| Leafy Sprigs → Garland | 8–15 min | Beginner | Modular | Woodland flourish |
| Tiny Lanterns (battery-LED) | 10–15 min | Beginner+ | 2×2 | Warm twinkle |
Parts & Prep (general)
- Core colors: bright/medium orange, dark tan, nougat, olive/sand green, pearl gold/black for accents.
- Useful elements: 2×2 & 2×3 curved slopes, 1×2 & 1×3 plates, 1×1 rounds/tiles, 1×1 cones, 2×2 round tiles/jumpers, 1×2 brackets, 1×1 clips/bars, window/brick-with-grille for lantern sides.
- Optional: battery tea lights (never real flame), clear 1×2/1×1 elements for “glass,” small turntables for spinning centerpieces.
Build 1 — Stacked Pumpkins (two sizes)

Goal: Round, chunky pumpkins with a hint of ribbing and a sturdy base.
Suggested parts (per pumpkin)
-
Small (≈6×6 studs, 3–4 bricks high):
-
1× 4×4 round plate or 2× 3×3 quarter-round plates (base)
-
8–12× 2×2 curved slopes (orange tones)
-
6–8× 1×2 plates (inner scaffolding)
-
1× 2×2 round tile/jumper for the top
-
Stem/vine: 1× 1×1 cone (brown) + 1× bar/clip + 1× leaf element (green)
-
-
Large (≈8×8 studs, 5–6 bricks high):
-
1× 6×6 round plate or ring of plates to match
-
16–20× 2×2 curved slopes (mix orange/dark tan for “age spots”)
-
12–16× 1×2 & 1×3 plates (inner scaffolding)
-
1× 2×2 round tile/jumper top + optional 2×2 radar dish (concave)
-
Stem cluster: 1× 1×1 cone (brown), 1× 1×1 round + 1× leaf/whip
-
Steps (both sizes)
- Base & core: Build a round base; stack a simple plate “core” two plates high in the center.
- Ribbing: Ring the sides with 2×2 curved slopes; stagger seams for a natural curve.
- Cap: Add a 2×2 round tile/jumper; offset the cone stem slightly so it feels organic.
- Character: Pepper 1–3 dark tan slopes for weathering; add a vine using a bar + leaf.
- Stability: If it wobbles, tuck a 2×2 brick inside for hidden ballast.
Style riffs
- Sugar-pie stack: small pumpkin perched on the large one (use a 2×2 jumper between).
- Gourd palette: swap a few orange slopes for nougat/dark tan to mimic mottled skin.
Build 2 — Leafy Sprigs → Modular Garland

Goal: Snap together leaf segments you can scatter or connect into a garland.
Suggested parts (per sprig segment)
- 1× 1×4 plate (backbone)
- 2× 1×2 plates with bar or with clip (connection points)
- 3–5× leaf elements (olive/sand green/dark green)
- 2–4× 1×1 round tiles/plates (berries in #EFA607 Amber or nougat)
- Optional: 1×1 cheese slopes in dark tan for fallen leaves
Steps
- Backbone: Place a 1×4 plate; attach a bar/clip at each end (one faces left, one right).
- Foliage: Stagger 3–5 leaf elements along the backbone; overlap for fullness.
- Berries: Dot 1×1 rounds sparingly (odd numbers read “natural”).
- Chain: Alternate bar-to-clip to connect segments into any length you need.
Style riffs
- Mantle runner: 5–7 segments chained, draped across books.
- Scatter set: 3 single sprigs laid around pumpkins for depth.
Build 3 — Tiny Lanterns (battery-LED safe)

Goal: A 2×2 lantern with a warm glow—perfect perched beside pumpkins.
Suggested parts (per lantern)
- Base: 1× 2×2 plate (black/pearl gold)
- Walls: 4× 1×1 bricks with grille or 1×1 bricks + clear 1×1 rounds/plates for “glass”
- Frame: 2× 1×2 plates with clip + 1× bar (handle)
- Top: 1× 1×1 cone (gold/black) + 1× 1×1 round tile
- Light: 1× battery tea light placed behind or under the lantern (not inside if it won’t fit)
Steps
- Base: 2×2 plate in black/gold.
- Walls: Build up two bricks high with grilles or clear bits facing out.
- Crown: Add 1×1 cone; attach clips opposite each other; span with a bar for the handle.
- Light it: Position a battery tea light behind or under a translucent tile—test for spill and glare.
Safety note: Use battery LEDs only. No open flame near plastic elements. Ever.
Compose Your Fall Vignette (fast wins)

- Rule of thirds: Place the large pumpkin off-center; small pumpkin + lantern form a secondary cluster.
- Color rhythm: Repeat Amber #EFA607 (berries, lantern crown) at least three times to tie the scene.
- Height stack: Books or a small wooden block lift the back corner; leaves cascade down toward the viewer.
- Surface: Neutral #D3D3D3 tray or runner makes oranges pop and keeps tiny parts corralled.
Troubleshooting
- Pumpkin looks boxy: Add another ring of 2×2 curved slopes; rotate a few to break symmetry.
- Garland too stiff: Replace one connection with a 1×1 clip to bar hinge to gain bend.
- Lantern dull: Swap one wall to clear pieces or place the LED slightly behind for rim-light.
Wrap-Up
Three tiny builds, one big seasonal mood. Whether you’re styling a mantle or adding a warm accent to your desk, these LEGO compatible pumpkins, leaves, and lanterns make fall feel hand-built and personal. If you try them, tag @Brickform, we’ll feature our favorites, and tell us which colorway you picked.
LEGO® is a trademark of the LEGO Group, which does not sponsor, authorize, or endorse this product.


0 comments